Windows
Connecting with PowerShell (Windows 10 and later)
Windows 10 and later versions include a built-in OpenSSH client, allowing you to connect to servers using PowerShell. This eliminates the need to download and configure PuTTY for basic SSH access.
Steps:
-
Ensure OpenSSH Client is installed: Open Settings > Apps > Optional features. If "OpenSSH Client" is not listed, click "Add a feature" and select "OpenSSH Client" to install it.
-
Open PowerShell: Search for "PowerShell" in the Windows start menu and open the application.
-
Connect to Elja: Use the following command, replacing
<username>with your username on the Elja cluster:ssh <username>@elja.hi.is -
Authentication: If this is your first time connecting, you may be prompted to confirm the server's authenticity. Type
yesand press Enter. You will then be prompted for your password on Elja (if password authentication is enabled and you haven't set up key-based authentication - recommended for security).
Key-Based Authentication with PowerShell:
Using SSH keys with PowerShell is highly recommended for security. You can generate a new key pair directly in PowerShell:
-
Generate a new key pair:
ssh-keygen -t rsa -b 4096This will prompt you for a file name to save the key (default is
id_rsa) and a passphrase (optional, but recommended). -
Send your public key to administrators: After generating your key pair, you need to send the public key to the administrators. View the content of your public key file:
type $env:USERPROFILE\.ssh\id_rsa.pub
- Copy the public key to Elja Copy the content and send it to the administrators.
After the public key has been uploaded to the login node by the admin, you can log into the system like this:
ssh-copy-id <username>@elja.hi.is
Copy the entire output (it starts with "ssh-rsa" and ends with a comment) and send it to the administrators. They will upload it to the login node to grant you access.
- Connect with PowerShell (without password): Once the administrators have added your public key to the system, you should be able to connect to Elja with PowerShell without being prompted for a password:
ssh <username>@elja.hi.is
Connecting with PuTTY (Alternative method for all Windows versions)
If you prefer using PuTTY or are using an older Windows version without built-in SSH support, follow the instructions below.
PuTTYgen & PuTTY
Download PuTTY here. Included is a tool called PuTTYgen which is used to generate an SSH key-pair.
The SSH key pair generated with PuTTYgen is used to securely connect to the server, either directly through PuTTY or when using SFTP file transfer software like FileZilla or Cyberduck.
Generating an SSH Key
Start PuTTYgen. Select key type RSA and increase the number of bits to 4096:

Press "Generate" and move the mouse cursor around. After successfully generating a key, your screen will look like this:
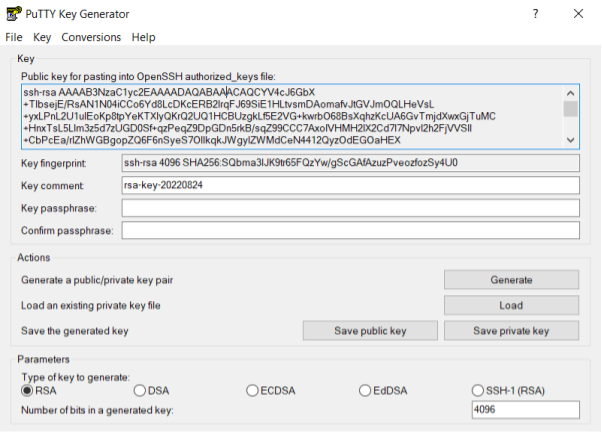
The public key is shown in the text box. Either copy and paste it into a text file, or save it by pressing the "Save public key" button. The private key (not shown!) needs to be saved as well. Press "Save private key" and place it in a directory that is out of sight (but easy for you to remember the location of).
It is OK to leave the passphrase empty, though this is less secure.
Never share your private key file or its contents with anyone. System administrators will NEVER legitimately request your private key - not even for troubleshooting purposes. Do not email it to yourself, upload it anywhere, or provide it to anyone under any circumstances.
The public key needs to be shared with the administrators, and a copy of it is made in your directory on the cluster.
Credentials in PuTTY
Open PuTTY and navigate to Connection > SSH > Auth on the left in the category panel. Press "Browse" next to the empty field below "Private key for authentication:" and select your private key (e.g. the *.ppk generated with PuTTYgen):

In later versions of PuTTY, the "Private key for authentication" field can be found in Connection > SSH > Auth > Credentials. See image below.

Storing the Session and Connecting
Navigate back to Session on the left and fill in "Host name" as "elja.hi.is". Type a name into the empty "Saved Sessions" field (for example elja) and press "Save". PuTTY will store the host information and link to the private key.
The administrator needs a copy of the public key to grant you access to the login node.

Now press "Open" to connect to the login node. You may be prompted to accept the server's key; press "Accept" if prompted. After entering your username into the command prompt, your screen should look like this:
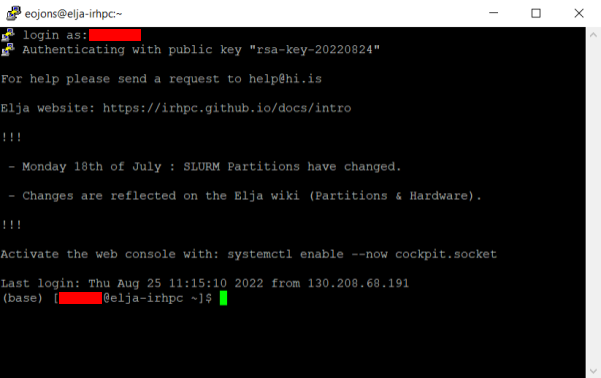
You are now logged in! Welcome to Elja.
The next time you open PuTTY, just select the saved session "elja" and press "Open".